Automated testing using Appium
Author
Katarina Draganjac
Date
Category
Development

Even though you can cover almost every part of the app with manual testing to ensure its quality, automated testing can be helpful when you catch yourself testing some parts of the app over and over again.
In order to avoid human error and to make that process faster, automated testing is becoming more and more popular. However, it is necessary to choose a tool that will help you carry out such a task.
When it comes to mobile testing, there are a few options but, because of its simplicity, one of the most known tools of that kind is Appium.
Appium is a cross-platform solution for mobile test automation. It is an open-source tool for automating mobile applications on iOS and Android platforms.
In the following sections, we will go through the process of creating a simple automated test using Appium and Python.
Prerequisite steps
First, you need to install Appium and all of the necessary components. We won’t focus on the installation, as there are many tutorials already available, and because the process is pretty simple. Nevertheless, everything starts from Appium official webpage, where you can download it.
After everything is set up and ready, we can start with the basic example of an automated test.
First of all, open Appium by clicking on its icon. You will now have an option to start the server and, by doing so, you will get to another screen where you can see all logs, but also find an important option - Start inspector session. That option enables you to inspect your app element by element. This is the key for creating tests because Appium lets you inspect your app but also record every action you make in it.
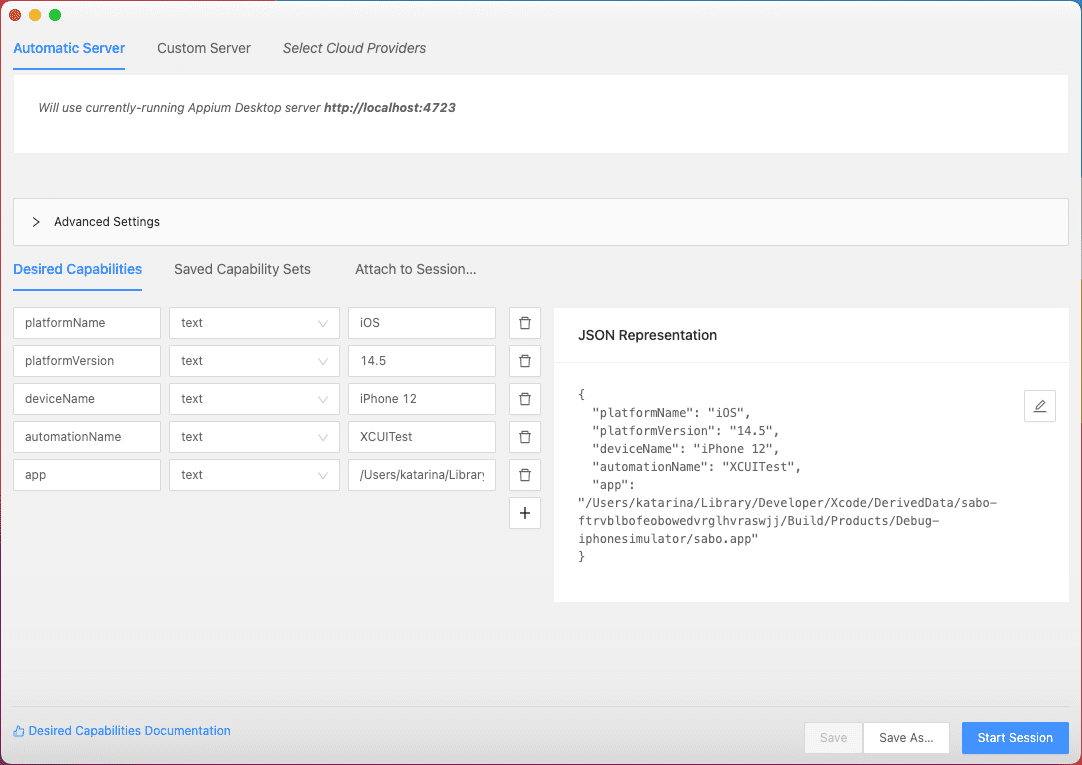
So, after you choose the option Start inspector session, another important topic related to Appium opens up - Desired capabilities. Without defined desired capabilities you won’t be able to run your app because they give important information to the Appium drivers, so this is a necessity.
You can find the list of all desired capabilities for iOS and Android. In the example below, you can see some important capabilities:
- • PlatformName - iOS, Android
- • deviceName - name of the simulator/emulator
- • platformVersion - version of the simulator/emulator
- • automationName - most common are XCUITest for iOS and UiAutomator2 for Android
- • App - path to the .app/.apk

Recording the actions
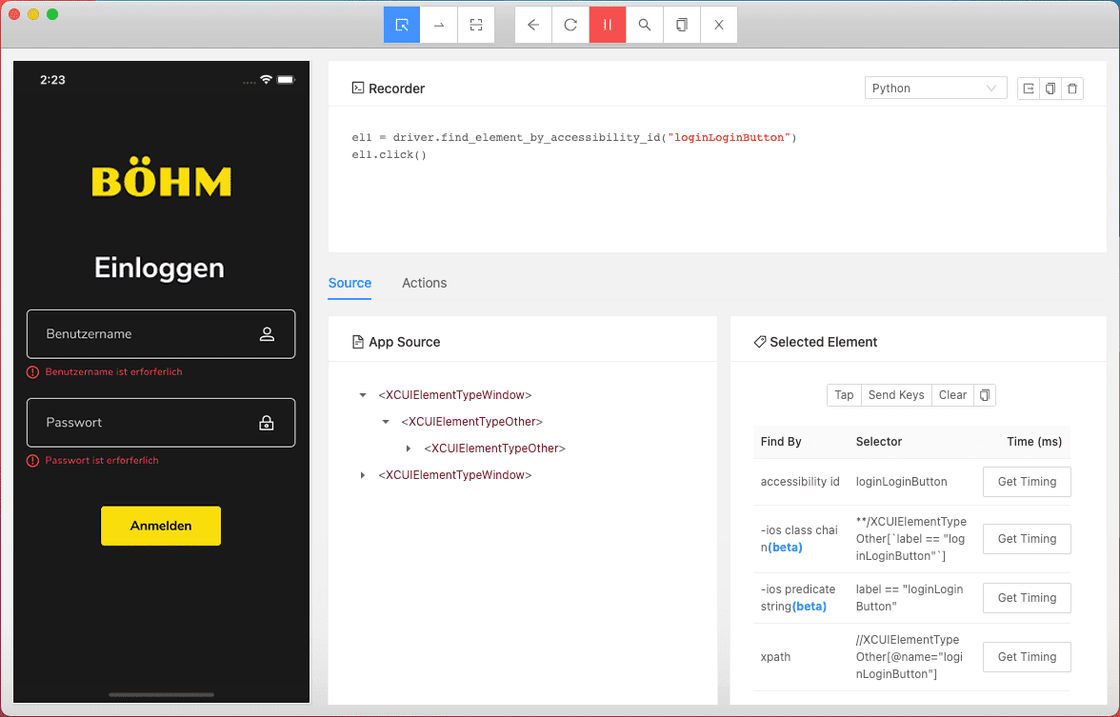
After setting the capabilities, you can start the session. The app will open both on simulator/emulator and Appium. Using Appium you can select or tap any element in your app as well as swipe through it. By tapping an element, you get the details about it, for example, you can see its accessibility ID and XPath.
Also, if you have a field in the app, you can select it and set its value by clicking the Send keys option. If you click on the option Start recording, every action will be automatically written down. This is a crucial option as it simplifies the process of creating automated tests because you actually just have to go through the app and perform the actions that you want your automated test to do for you later.
When you are done, just stop the recording and simply copy the code from the recorder so that you can paste it into your code editor.
Before that, there are some options that you should consider. First, you can choose the language that you want the code to be written in. That could be JavaScript, Java, Ruby or Python. In this case, we will choose Python. Another option is Show/Hide boilerplate code. This is helpful because it will add some prerequisites (such as desired capabilities) that are necessary in order to run the test later.

Saving the code to run it later
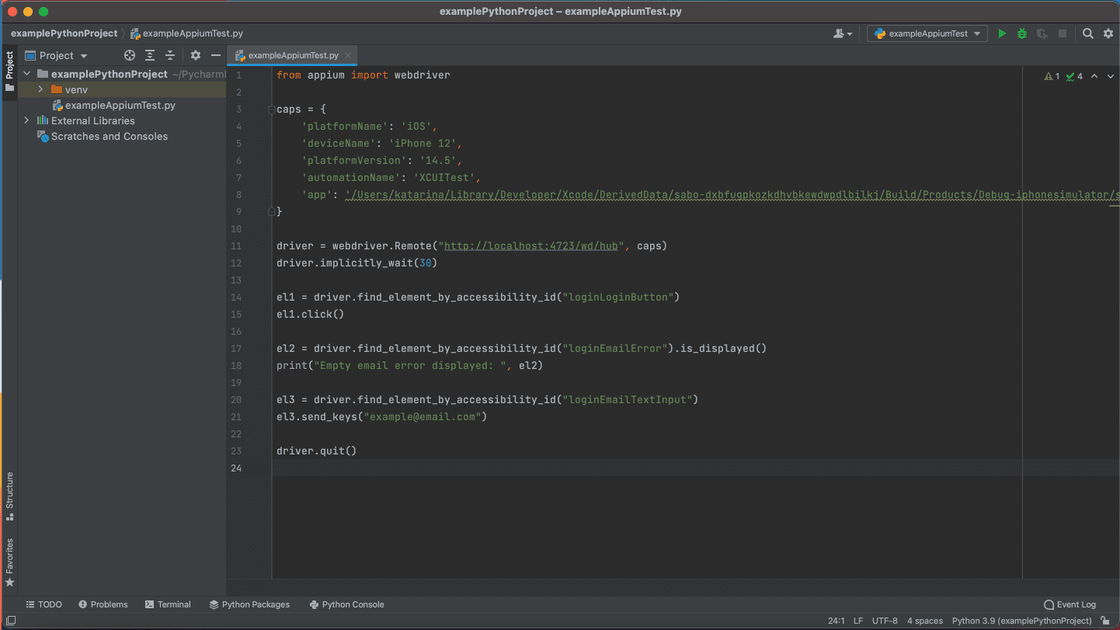
Since Python is the language of our choice, we opted for PyCharm for the code editor. Obviously, you can use any other that is compatible with Python.
On the website Appium Python Testing you can find the steps for installing both Python and PyCharm. You will also see the process of setting up PyCharm in order to work with Appium, so we won’t focus here on that.
Now, open the code editor and paste the code that Appium had created for you. You can run the code right away but make sure that the Appium server is running first. Usually, when you run the code straight from Appium, you will get an error because the actions will be executed before the app could load. This can be easily fixed by adding the command driver.implicitly_wait(s), which enables the app to load fully before any action takes place.
Of course, Appium shouldn’t do everything for you, so there are some commands you can add in the code by yourself, commands you can use for validation or similar. For example, you can use the command .is_displayed() to check if something is shown on the screen after some action is executed.
Besides that, you can change how the elements in the app will be found. All locators can be found in the Appium official documentation. The most popular ones are XPath, because every element has it by default, and accessibility ID, because it is the most reliable locator. Keep in mind that you can always check the documentation if you want to see all the possibilities that Appium offers.
Finally, when you execute the code, the app will open in simulator/emulator as defined in the desired capabilities and Appium will run all the actions according to the test script. If it fails, you will get an error that will specify where the problem is.

As you can see, Appium lets you create automated tests in a simple way. Just go through the app and Appium will record the actions for you. Also, you don’t have to be a programmer to learn all possibilities that Appium offers and to implement that code in a specific programming language, making it ideal for beginners.